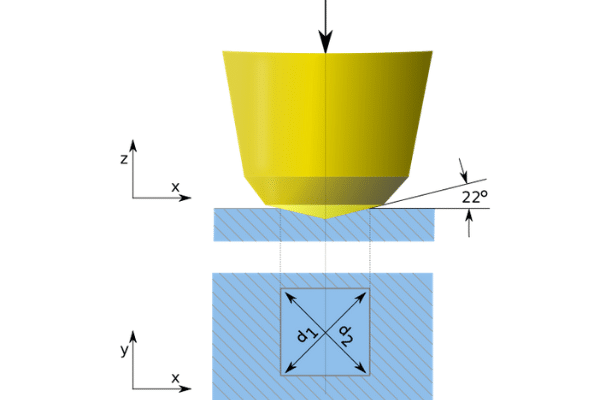
The Vickers hardness test is an easy-to-apply method for measuring the hardness of a wide variety of materials used in industry. In this article, we explain what the Vickers hardness test is and what it is used for.
What is the Vickers hardness test?
The Vickers hardness test is a method developed in 1924 by Smith and Sandland at Vickers as an alternative to the Brinell test or the Rockwell hardness test for measuring the hardness of materials. The Vickers test is generally simpler to use than other hardness tests, since the calculations required are independent of the indenter size and the indenter can be used to test a wide range of materials, regardless of their hardness.
The Vickers hardness test, also called the microhardness testing method, is mainly, but not exclusively, used to determine the hardness of small parts and thin sections.
The Vickers test can be used for all metals and has one of the widest scales among hardness tests. The unit of hardness given by the test is known as the Vickers pyramid number (HV) or diamond pyramid hardness (DPH).
What is the Vickers test and how is it performed?
The Vickers test is based on an optical measuring system. The microhardness test procedure, ASTM E-384, specifies a range of light loads using a diamond indenter to perform the drilling, then the hardness value is measured and established.
A pyramid-shaped diamond indenter with a square base is used for testing on the Vickers scale. Normally the loads are very light, ranging from 10gm to 1kgf, however, they can go up to 30 kg or more. The shape of the indenter must be capable of producing geometrically similar impressions, regardless of size; the impression must have well-defined measurement points and the indenter must have a high resistance to self-deformation.
The Vickers hardness test method involves indenting the test material with a load of 1 to 100 kgf. The full load is normally applied for 10 to 15 seconds. The two diagonals of the indentation remaining on the surface of the material after removal of the load are measured with a microscope and the sloping surface area of the indentation is calculated. The Vickers hardness measurement is thus obtained by dividing the load in kgf by the indentation area in mm squared.

What are Vickers hardness tests used for?
Vickers hardness testing has proven to be very useful in materials and component evaluation, manufacturing process quality control, forensic engineering, research and materials development and innovation.
One of the benefits of this test method is that only one type of indenter is required and it can be used for all Vickers tests. Non-destructive testing is also possible, so that the test specimen can be used for other purposes.
The Vickers hardness test can be used on any and all materials, from soft to hard, as the procedure covers the entire hardness range. It can be used to test metals, ceramics, composites and virtually any type of material.
In conclusion, Vickers tests are commonly used to test the hardness of industrial materials and components and have proven to be extremely efficient. Need to test the hardness of a material? Contact Infinitia and our experts will analyze your case.
Don’t want to miss the latest industry news? Check Infinitia’s news.
